ever looked at a solar panel on a rooftop and wondered how to put it on paper? You don't need to be an artist or have expensive drawing tools. A pencil, an eraser, and a little patience are enough to get started.
Learning how to draw solar panels is a fun way to explore renewable energy while practicing basic shapes, lines, and shading. Whether you're a student working on a school project, a beginner learning to sketch, or someone creating an illustration about solar power, this guide will walk you through the process without making it complicated.

What Do You Need Before Drawing a Solar Panel?
Before picking up your pencil, gather a few basic supplies:
- A regular pencil for outlining the panel.
- An eraser to clean up unwanted lines.
- A ruler for straight edges and evenly spaced grid lines.
- A blank sheet of paper or a sketchbook.
- Colored pencils or markers if you want to add color.
You can also use a digital drawing app if you prefer working on a tablet. The important thing is to start with a simple outline rather than worrying about every small detail.
How to Draw Solar Panels Step by Step
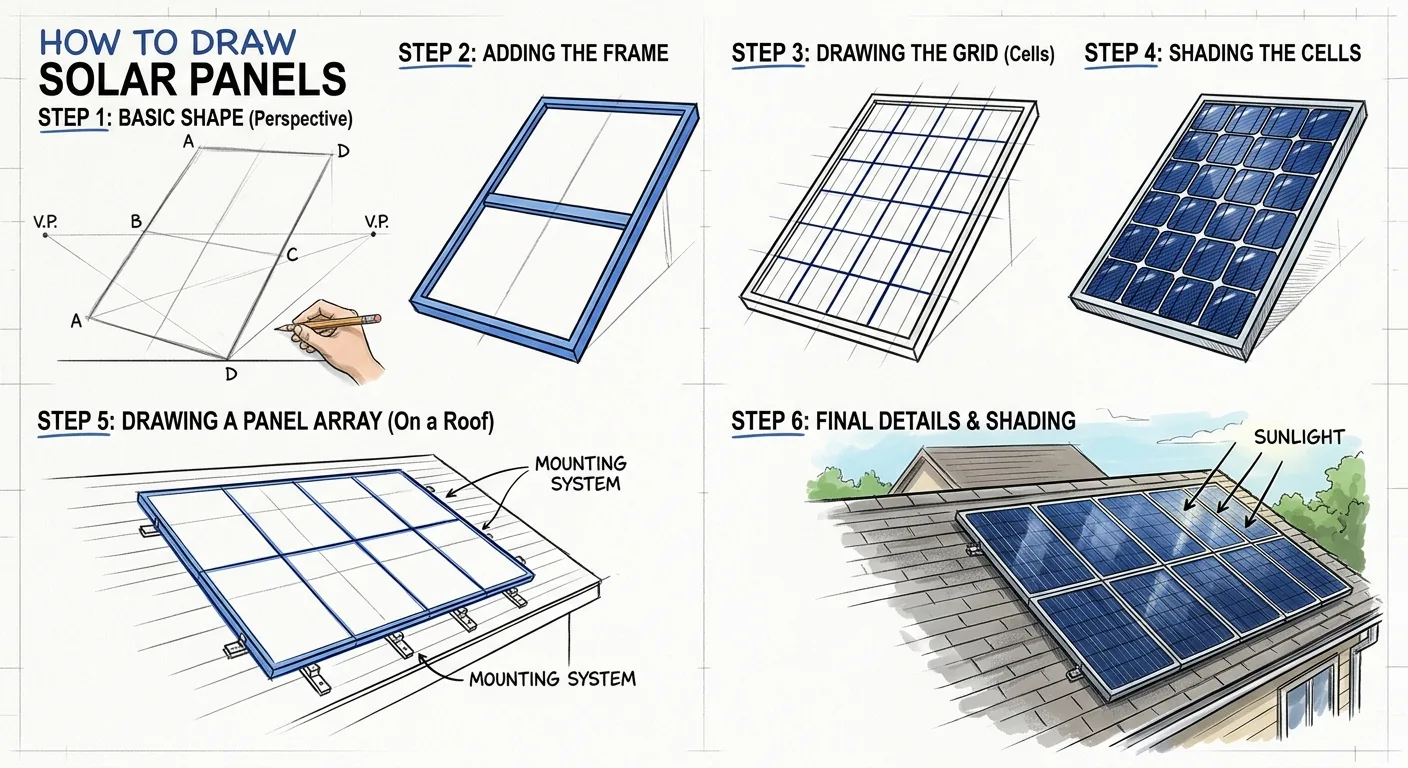
Let's break the drawing into manageable steps. The goal is to create a recognizable solar panel with a rectangular frame, photovoltaic cells, and a few details that make it look more realistic.
Step 1: Draw the Main Panel Shape
Start by drawing a large rectangle with a ruler. This will be the outer shape of your solar panel.
If you want to give the drawing a three-dimensional appearance, slightly tilt the rectangle. Draw a second, smaller line just inside the outer border to represent the panel frame.
Don't worry if the first outline isn't perfect. You can adjust the corners and proportions before adding more details.
Step 2: Add the Solar Cell Grid
Now comes the part that makes the drawing look like an actual solar panel.
Inside the rectangle, draw several evenly spaced vertical and horizontal lines. These lines create smaller rectangular or square sections representing the photovoltaic cells.
Try to keep the spacing consistent. A ruler makes this much easier, especially if you're creating an educational solar panel drawing.
For a more detailed sketch, add thin borders between individual cells.
Step 3: Draw the Panel Frame and Edges
Solar panels have a visible structure around their active surface. Darken the outside border and make the frame slightly thicker than the internal grid lines.
If you're drawing a panel from a side angle, add a narrow strip along one edge to suggest its thickness.
A few carefully placed lines can make a flat rectangle look more like a physical piece of equipment.
Step 4: Add the Electrical Details
Want your sketch to communicate more than just the appearance of a solar panel?
Add a small junction box on the back of the panel, along with two simple connecting cables. You can also draw a few lines leading toward a battery or inverter if you're illustrating a basic solar power system.
Keep these details simple. Too many wires can make a beginner's drawing look crowded.
Step 5: Add Shading and Color
A little shading makes a big difference.
Use dark blue, navy, or gray to color the photovoltaic cells. Leave some lighter areas to suggest reflected light on the panel surface.
The frame can be shaded gray or black, while the background can remain white.
If you want a more realistic appearance, use slightly different shades across the cells instead of coloring every section exactly the same way.
Tips for Making Your Solar Panel Drawing Look Better
A few small adjustments can turn an ordinary sketch into a much more convincing illustration.
- Pay attention to perspective: Keep the panel edges aligned. Even a simple angled view looks better when the proportions are consistent.
- Keep the cell grid organized: Uneven spacing is one of the easiest ways to make a solar panel look unrealistic.
- Don't overdo the details: The frame, cell grid, and electrical connections are usually enough for a basic illustration.
- Use reference photos: Looking at real solar panels helps you understand how their frames, surfaces, and cell patterns are arranged.
- Experiment with different views: Try drawing a rooftop solar panel, a ground-mounted array, or a flexible solar panel on an RV roof.
One useful exercise is to draw the same panel from both a front view and a side view. You'll start noticing how perspective changes its shape.
Why Learn to Draw Solar Panels?
Solar panel drawing isn't just an art exercise. It can also help students understand the basic appearance and structure of photovoltaic modules.
Teachers can use simple sketches to introduce renewable energy concepts. Designers can use them for early project illustrations, while solar enthusiasts may find them useful when explaining basic solar equipment to others.
For more technical illustrations, you can gradually add details such as mounting structures, wiring connections, and system components. Just remember that a basic drawing is not a substitute for an engineering or electrical installation diagram.
Final Thoughts
Learning how to draw solar panels doesn't have to be difficult. Start with a rectangle, build the photovoltaic cell grid, add the frame and electrical details, and finish with some simple shading. Once you've mastered the basic shape, experiment with different angles and installation scenes.
At Bright Solar, we believe that making solar energy easier to understand starts with sharing knowledge. Whether you're sketching a solar panel for a school assignment or exploring how photovoltaic technology works, every drawing is a good place to start.