Solar panels are everywhere these days. You can spot them on house roofs, RVs, boats, and even small outdoor devices. But have you ever tried to draw one? At first, it may seem like a simple rectangle with a few lines inside. Once you look closer, you'll notice the frame, photovoltaic cells, connecting details, and the way light reflects off the surface.
If you want to draw a solar panel, you don't need professional art skills. A pencil, ruler, eraser, and a little patience are enough to create a recognizable sketch. This guide takes you through the process, from the first outline to the finished illustration. You can follow along even if drawing isn't something you do regularly.

What Do You Need Before You Start?
There's no need to buy a full set of professional drawing supplies. A few everyday items will do the job:
- Pencil: For the initial outline and smaller details.
- Ruler: To keep the panel edges and cell grid straight.
- Eraser: For removing construction lines and correcting proportions.
- Drawing paper: Any sketchbook or plain paper works.
- Colored pencils or markers: Useful for adding blue, gray, and black shades.
If you prefer digital artwork, a drawing tablet works just as well. The basic shapes and steps remain the same.
How to Draw a Solar Panel Step by Step
The easiest approach is to work from the outside toward the center. Get the overall shape right first. There's no reason to worry about tiny details before the main structure looks correct.
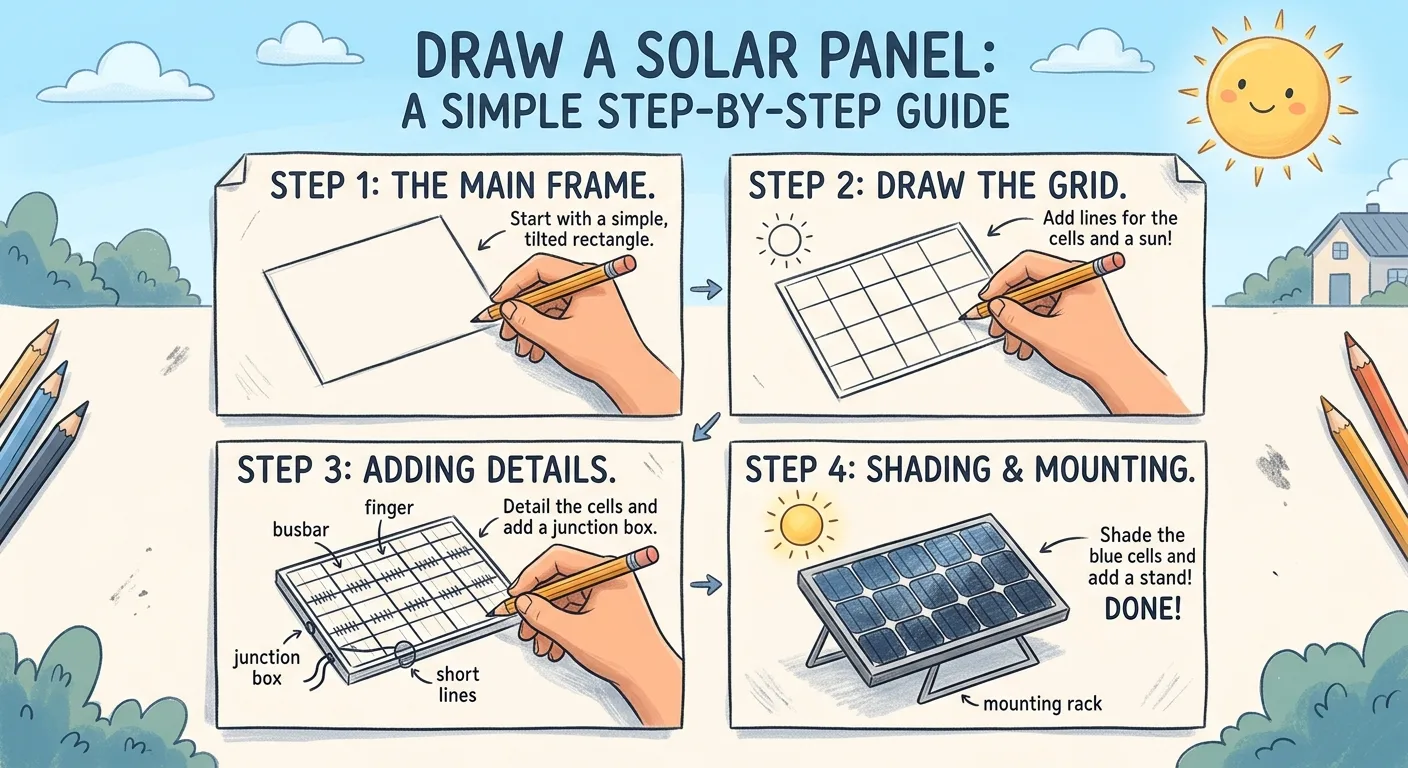
Step 1: Sketch the Outer Rectangle
Start by drawing a horizontal rectangle. This will become the main surface of your solar panel.
For a straightforward technical illustration, keep the rectangle level. If you want a more natural-looking sketch, tilt it slightly to create an angled perspective.
Next, draw a second rectangle just inside the first one. This narrow gap represents the panel frame.
Don't press too hard with your pencil. These first lines are only a guide, and you may want to adjust them later.
Step 2: Draw the Photovoltaic Cell Grid
Now focus on the surface of the panel.
Draw several vertical lines across the inner rectangle, followed by horizontal lines. Together, they form a grid of smaller sections representing the photovoltaic cells.
Try to maintain similar spacing between the lines. This is one of the most important details in a solar panel illustration.
You don't have to make every cell identical, but an organized pattern will make the finished drawing look much more convincing.
Step 3: Add the Frame and Panel Edges
A solar panel needs a visible border to separate its cells from the surrounding structure.
Darken the outer frame and make it slightly thicker than the internal grid lines. If you're drawing from an angled view, add a narrow side edge along the bottom or one side of the rectangle.
This small adjustment creates the impression of depth rather than making the panel look like a flat sheet of paper.
Step 4: Include the Electrical Details
Want to make your solar panel sketch more interesting?
Add a small junction box to the back of the module. Draw two simple cables extending from it. You can also include a basic mounting bracket underneath the panel.
For an educational illustration, consider drawing a battery or inverter next to the panel and connecting them with simple lines.
Keep the electrical details clear and uncluttered. The panel itself should remain the main focus.
Step 5: Add Color, Light, and Shadow
This is the stage where your drawing starts to feel complete.
Use dark blue or navy for the photovoltaic cells. Gray or black works well for the frame. Add a few lighter blue areas across the surface to suggest sunlight reflecting off the cells.
If you want a three-dimensional effect, shade one edge slightly darker than the other. You can also leave small highlights rather than coloring the entire surface uniformly.
A little contrast goes a long way. You don't need complicated shading techniques to make a simple drawing look attractive.
3 Creative Solar Panel Drawing Ideas
Once you've completed the basic sketch, try changing the subject. These ideas can also make your artwork more interesting for school projects, social posts, or renewable energy presentations.
1. Draw a Solar Panel on a House Roof
Start with a simple house outline, then add several panels following the roof angle. This is a good exercise for practicing perspective and showing how residential solar installations look.
2. Draw an RV Solar Panel
Sketch a camper van or recreational vehicle with a solar panel mounted on its roof. Include a few roof details, such as vents or mounting brackets, to make the scene feel more realistic.
3. Draw a Flexible Solar Panel
Instead of a traditional rigid rectangle, try drawing a thin solar module following a slightly curved surface. This is an interesting subject for illustrating flexible solar technology used in certain mobile and marine applications.
Common Drawing Mistakes to Watch Out For
Even experienced sketchers sometimes overlook small details. Here are a few things worth checking before finishing:
- Uneven cell spacing: Use a ruler to keep the grid organized.
- An oversized frame: Make sure the border doesn't take up too much of the panel surface.
- Incorrect perspective: Keep the edges consistent with the viewing angle.
- Too much shading: Excessive dark areas can hide the cell pattern.
- Missing structural details: A frame and a few electrical connections help the illustration look more complete.
One practical suggestion: Keep a photograph of a real solar panel nearby while drawing. Comparing your sketch with an actual module can help you notice differences in proportions and surface details.
Final Thoughts
It's surprisingly easy to draw a solar panel once you break the process into smaller steps. Begin with a rectangle, create the photovoltaic cell grid, add the frame, and finish with electrical details and shading. After that, you can experiment with different angles, rooftop installations, and flexible panel designs.
At Bright Solar, we believe that understanding solar energy can start with something as simple as a drawing. Whether you're a student, a beginner artist, or someone interested in photovoltaic technology, take your pencil and give it a try. Your first sketch doesn't need to be perfect. The next one will be better.